Wednesday, December 27, 2017

Become a Golf Ball Striking MASTER!

Let's be honest for a moment. Would you rather hit a 300 yard drive straight down the middle, then smoke a 5 iron to within 10 feet of the hole, and then 3 putt for a bogey? Or, would you rather bounce one off a tree, skank one up that trickles onto the green and then drain a 50 footer for birdie?

If you said make the birdie, this online golf instruction video isn't for you! However, if you're like EVERYONE else that plays golf, then listen up, because I've got an incredible 10 part video series that teaches you the ball striking secrets of the pros!

I'm going to walk you through how control trajectory and spin, how to get more distance off the tee, how to shape the ball both ways WHILE altering the trajectory and much more!

Each video will walk you through a different phase in the 9 day course. In day 1, we start with the most critical element of shot shaping and that is controlling the left wrist at impact. This is the core fundamental to becoming a golf ball striking genius. If you can't control your left wrist at impact, you will not be able to shape the ball at will, so don't skip ahead from this step until you have it down!

Each video builds on the last. So, once you learn impact control, we teach you how to hit it low. This will be new for many of you if you're used to flipping the club at impact. The dreaded flip/scoop is so common in amateur golfers that you'll likely find just getting the Day 1 drill down to be a challenge. But stick with it, it's the first fundamental that all the pros do correctly.

So, enough talk, let's jump into the series, start watching here.

Friday, November 24, 2017


How many times have you heard that you should grip the golf club based on however your arms "naturally hang"? I've seen this HORRIBLE advice in numerous golf magazines and nothing could be further from the truth as I discuss in this golf instruction video.

The reality is that NO ONE's hands naturally hang with their palms facing their thighs. Some uneducated instructors will have you believe that this is just part of your genetic disposition and you are forever relegated to having a very strong grip.

However, the truth is that this position is only achievable when you allow your shoulders to slump forward and protract your shoulder blades. Give it a try for yourself like I show in the video above then check out http://www.oneplanegolfswing.com to learn more about why this bunk advice is hurting your golf swing.

Wednesday, September 28, 2016

How to Increase Your Club Head Speed TODAY!

Have you wondered how the pros on the PGA Tour hit the golf ball so far while looking like they're swinging so slow? The secret is LEVERAGE.

Leverage is power without effort in the golf swing. With leverage, you can easily lift something three times as heavy as you are just through mechanical leverage. I like to explain to my golf students the concept of leverage by thinking about swinging a hammer as it closely resembles swinging a golf club. Understanding this concept of leverage is the secret to increasing your club head speed.

When you swing a golf club, the majority of your club head speed comes from the release of your wrist angle. This release multiplies the speed of the golf club by a factor of four in only three feet of movement! That's right, in that last three feet of the golf swing a good player's club head speed is going to more than quadruple!

In most amateur's golf swings, they've already expended all their effort before they get to the ball and their club head speed is not increasing, in fact, it's often decreasing. That's because they try to get speed too early in the golf swing by releasing their wrists too soon.

To release the golf club at the right point in the golf swing, the entire swing must be sequenced correctly and that all starts with weight shift as I discuss in this golf instruction video. If you shift your weight to start the downswing, your wrists can remain cocked and relaxed.

If you want to increase your golf swing speed, yo also must understand how the left wrist works in the golf swing. Most golfers over use their right hand and that leads to club head throwaway. In the video below I show you just how important the left hand is in the golf swing and give you a drill to learn how to train it to increase your swing speed.

Sunday, September 13, 2015

How to Create a Membership Site - Introduction

Have you always wanted to learn how to start your own subscription website?


My golf instruction website has done quite well over the past ten years. It's allowed me to help hundreds of thousands of golfers around the world improve their golf swings and enjoy the game of golf again. But what many people don't realize is that I also did all the technical coding of the website.

I enjoy the technical aspects of building a membership website just as much as I enjoy the technical aspects of the golf swing. I'm a very analytical person by nature and the complexities of both the golf swing and the software programming world are very interesting to me. Growing up, I was the kid who took apart all his toys just to understand how they work!

In 1999, I started my first ever membership site called MountainWeb.com It was a website for outdoor enthusiasts who liked to go hiking, climbing, biking etc. In 1999, membership websites and the subscription business model didn't really exist online. There was a steep learning curve but I was able to build and sell a profitable business during the dot-com era.

Fast forward to 2005 and I started oneplanegolfswing.com which later turned into RotarySwing.com, a golf instruction membership website with over 250,000 members. I built it to this number using the techniques that I developed and perfect over 16 years of building subscription websites.

Now, I'm sharing my trade secrets with the world at my latest membership site, https://SubscriptionSiteStartup.com. The site walks you through step by step how to build a membership website and grow it into a profitable business. From marketing and startup strategy, to the technical details and research, it covers it all.

So, if you've ever wanted your own recurring revenue stream, go to the site and sign up for my newsletter where I'll share my tips and tricks on how to make your online business dreams come true.


Friday, August 7, 2015

How to Use Legs for Power in Golf Swing

How to Swing from the Ground Up in the Golf Swing

How many times of you heard that you should use your legs in the golf swing? None other than Jack Nicklaus said that he got most of his power in his golf swing from the ground! What on earth does that mean, you might ask yourself! How do you get power in the golf swing from something that isn't moving?

Using the Ground for Leverage

The key is to learn how to use the ground for leverage. Using the ground for leverage means that you are physically pushing against the ground with your legs. This allows you to use the powerful muscles in your trunk for not only stability but for power in the golf downswing. 

The key to this is that as you start your backswing you need to start loading your legs and your hips, in particular your right hip so that as you get to the top of the back swing you are physically pushing down into the ground with your right leg. 

As you then start your downswing you want to shift back to the left and begin pushing against the ground with your left leg. This allows you to drive force into the ground with the lead leg which is the next key for explosiver power at impact. This pushing against the ground is often called ground reaction force and is a technical term for using the ground for leverage. 

Essentially what you're doing in the golf downswing is you are push pushing into the ground with your left leg imagining that you are pushing the ground away from you. This allows you to derive force from the ground through the legs which is which is then transferred up the kinetic chain to your arms and eventually to your clubhead.

A simple way of thinking about this is imagine you're swinging a golf club on an ice skating rink. Imagine how you would slide around as you would have no grip from your feet and hence you would not be able to use your legs. You would tend to swing all from your upper body and this is the weakest way that you could swing a golf club. Your golf swing should feel as if you were driving into the ground and you're very anchored to the ground with your legs. This will give you much more power in the golf swing and let allow you to swing much more efficiently using your big muscles.

In this golf swing video I go over how you need to load your body in the correct sequence in order to have a powerful and effortless golf swing. So, watch this golf instruction video and enjoy your new found power!


To see part two, click here!

Monday, February 11, 2013

Golf Hints for the Simple Golf Swing

Golf hints are a lot like stock tips, if they're not coming from a trusted source, they're worthless. With the simple golf swing developed by Chuck Quinton, you can master the golf swing mechanics in no time.

Simple Golf Swing Hints

This simple golf swing was developed with golf swing mechanics at its core. Compiling a bunch of random golf hints just wasn't going to do. Quinton used his understanding of the simple golf swing mechanics that led him to a +4 handicap and allowed him to win three golf tournaments.

His very simple golf swing mechanics have been admired by tens of thousands of golfers, and the image below shows exactly why - he's in a perfect, but simple mechanical position at the top of his backswing.

simple golf swing hintsHe developed the Rotary Swing Tour simple golf swing by first defining a set of requirements, and then meeting those requirements through golf swing mechanics.

Even something like golf posture and stance width had a set of requirements.
  1. You need stability for power
  2. You need to be able to transfer your weight between your feet without swaying off the ball
  3. You need to be able to move safely and avoid injury
Using these requirements, a simple set of golf swing fundamentals could be developed:

So, here's a golf hint on your setup - you must wide enough for stability but not so wide that you sway off the ball. After defining and meeting these requirements, the fundamental of stance width was established.

  Every single movement in the Rotary Swing Tour was looked at this way.

If you're looking for a simple golf swing that isn't based on a bunch of random golf tips and hints, then the Rotary Swing Tour is the only choice for you.

You will look just like Quinton does here at the top of your backswing, and most importantly, you'll know the simple steps and drills to get you there in the shortest time possible using the Rotary Swing Tour online golf lessons learning system.

And, best of all, you can start learning the Rotary Swing Tour completely for free!

  learn the simple golf swing     

Wednesday, January 23, 2013

Golf Backswing

Golf Backswing - How to Stop Over-Swinging


Without the body loaded correctly during the early stages of the golf backswing, any golfer will tend to over swing as their brains don't have a sense of muscular tension that would signal the beginning of the downswing.  This causes them to keep swinging well past parallel in their backswings and the golf swing becomes much more complicated.

This is frustrating because golfers who struggle with this have been told hundreds of times by their golf instructors to just "stop here" or just "shorten it up!" If it were that simple, they would just do it!  The key to fixing this problem is to properly load the right leg and core muscles during the backswing during the takeaway for most golfers. This acts as a signal for the brain to reverse directions as the muscles can't support much more load without becoming uncomfortable.

Try this during the takeaway. Try and focus on rotating and "torquing" your right leg and hip by feeling as if they remain stationary as you begin to rotate. If you feel the tension early in the golf swing, by the time you get to the top, you will be unable to swing back any further with your arms.  When you do this, you're going to feel fully loaded up by the time your arms get parallel to the ground, so it will make it impossible to overswing.

Practice "over-doing" this for a few days and notice how much shorter your golf backswing becomes!

Saturday, December 15, 2012

How to Hit the Perfect Sand Shot in Golf


The Perfect Sand Shot in Golf


When it comes to hitting sand shots most golfers get terrified of the proposition of launching the golf ball over the green.  The reality is that bunker shots are the easiest shot in all of golf to learn. All you need to is learn these three simple keys.

Sand Shot Critical Key Number 1 - Loft


The most important key in hitting the perfect sand shot is learning how to get the face open enough at address and keep it open throughout the golf swing.  If you don't have enough loft on the club you will be forced to take a short slow swing and will have a difficult time moving enough sand to get the ball out of the sand trap. This is because you don't actually hit the golf ball in a sand shot, instead you use the force of the sand propelling the ball upward to move the ball up and onto the green.  The sand is quite heavy and that requires that you swing relatively fast in order to move enough sand to launch the golf ball up in the air. 

However, if you swing fast and don't have enough loft on the club the ball will fly over the green.  So setting up with enough loft is critical, and there's a simple drill in this video that will show you how to keep the club face open throughout the entire backswing so you can make an aggressive swing without the fear of launching the golf ball over to green.

Sand Shot Critical Key Number 2 - Speed


As I mentioned in before, one of the main keys in the perfect sand shot is having speed so you can move enough sand to the ball up in the air.  Having enough loft goes hand-in-hand with having enough speed.  You need a lot of loft in order to afford you the ability to be aggressive on your sand shots. This sand shot golf instruction video gives you one simple image to learn how to have enough speed on your bunker shots.

Sand Shot Critical Key Number 3 – Divot


The last thing you have to do is make certain that you take out the “box of sand.”  As discussed in the sand shot video, practicing taking out the box drill will teach you to where to start your divot and where to have the divot exit in the sand to the take out the proper amount of sand each time.  As you'll see having the proper amount of bounce and having the face open enough, is critical to taking out this perfect divot each time so you get the golf ball to come out nice and soft with a lot of spin.  Most amateur golfers tend to dig too deeply and the divot box drill will keep you from making this costly mistake.

If you can master these three simple keys you will have no problem getting out of the sand trap any time. If you want to see the entire "How to Hit Sand Shots" section from the DVD "Short Game Made Simple", click here!

Friday, December 7, 2012

The Perfect Golf Swing - Lag and How to Get More of It!

If you're like most golfers, you find that developing more lag in your golf swing is a struggle. You know that you need lag in the perfect golf swing, but exactly how do you get it? First, there's one thing that you MUST NOT DO...

DON'T TRY AND HOLD ON TO LAG

This is one of the worst mistakes you can ever make in the golf swing. If you had to have a mantra about the perfect golf swing it would be this: "You never try and HOLD a position in the perfect swing, you are always MOVING THROUGH positions."

Creating lag adheres strictly to this rule. One of the most common mistakes a I see golfers make in perfecting their golf swings is trying to create a significant lag angle at the top of their backswings and then "hold on to it" throughout the entire downswing.

The opposite should be your goal. You should NOT have your wrists fully set at the top of your golf swing so that they can set MORE during the downswing. When your wrists are fully cocked at the top, they have nowhere else to do during the downswing but to cast the club. In an effort to avoid this, golfers are taught by their instructors to "hold on" to the angle. the problem is this is not possible. There are far too many forces at work physics wise to make it impossible to hold onto the angle.

For instance, a driver swung at over 100 mph effectively weighs 100 pounds through impact because of the centrifugal force. If you think the you can physically hold onto this much force your sadly mistaken. Because of this there is only one logical solution. You need to have your wrists not fully set at the top swing so that they can downcock in the downswing so that as you're moving into positions later in the downswing where it's critical to have lag you have it in spades where you need it most.

The down cock is a critical move in the downswing that nearly every tour player on the planet uses to create the proper amount of lag and downswing. Some do it more than others but the critical component is that they all but created out cocking motion rather than trying to hold on to the angle that they created at the top of the backswing.

When you properly down cock your wrists like this student you see in the video below you will have more lag than you know what to do with and be much further along the path to building your perfect golf swing.


When you're ready create lag like this in your perfect golf swing click here to learn exactly how this student of mine built this much lag in his golf swing and how you can too.

Saturday, October 20, 2012

Make Your Divots Start in Front of the Ball and Achieve the Perfect Golf Impact Position

Achieving the Perfect Impact Position and Divots that Start in Front of the Golf Ball


The impact position is everything in golf. How far your hands are in front of the golf ball, angle of the club face, the club path and more factors all determine where that little white devil flies. If you're like most amateur golfers, you struggle with getting your divots to start in front of the golf ball and that leads to a lot of less than perfect shots.

The Key to the Perfect Divot

In the image below, you can see that I have a lot of shaft lean at the moment of impact. In fact, my hands are actually TOO FAR out in front of the ball, but most amateurs would kill for this position, so I'm going to teach you how to get into the perfect impact position with this nice flat left wrist in the video below.

perfect golf impact divot
Plenty of shaft lean here!

It is clear to see in the image above that I have the handle of the golf club well ahead of the clubhead. This is what shaft lean looks like and is the main reason better golfers hit the ball much further than amateurs. By having my left hand in this position at impact, I've delofted the club significantly to the point that my 7 iron here is now effectively a 5 or even 4 iron. Since loft is the primary determinant of how far the golf ball will travel, learning how to deloft your irons like this at impact will not only make your divots start in front of the ball but also allow you to hit your irons 2-3 clubs longer than you currently do!

Most golfers don't realize that the left side of the body and the left arm in particular is responsible for a lot of the impact alignments you see in the professional golfers on the PGA TOUR all the time. Because most golfers are right handed, they become very right side dominant and never learn how to use the left hand to create the perfect impact position.

This video shows you exactly how to create the ideal impact position by giving you a simple swing drill that will allow you to train the left hand independent of the right. This is critical. You must isolate movements in order to learn them more efficiently, so taking the right hand off the club will make this process much easier. 


To see the full video with more tips and drills on how to get your divots in front of the ball, go to: ttp://www.rotaryswing.com/golf-instruction/swingfundamentals/golf-divot.php


Tuesday, October 2, 2012

How to Grip the Golf Club

No discussion on building the perfect golf swing would be complete without a discussion on how to grip the club. The grip has been discussed so much in golf instruction circles that I think most golfers are completely confused as to how they should grip the golf club and why they should grip it that way.

There are a few requirements for the golf grip in the perfect golf swing

First and foremost, the grip should be taken in such a way that allows the golfer to most easily square the club face at impact with minimal to no manipulation. After all, what good is a great golf swing that slices the ball into the woods?

Second, the golf grip should be taken in such a way that the golfer can apply leverage to help maintain lag. Many golfers that I see in daily golf lessons tend to have a very weak left hand grip on the golf club. This places the pad of the left hand to the side of the club shaft rather than on top of it, making it impossible to use the bones of the forearm and wrist joint for leverage. Here is a great golf instruction video and article on how the golf grip will effect your golf swing lag.

Third, the grip should allow the golfer to hold the club securely without requiring a great deal of muscular tension. Setting the hands up correctly on the club with minimal tension will allow the golfer to have the wrists relaxed during the golf swing which is critical for increasing the lag during the downswing and allowing the club to release naturally and freely with great speed.

So, those are the three requirements for the perfect golf grip, what does it look like?


This image is taken from the RotarySwing Tour golf instruction book written by Chuck Quinton. The book goes into painstaking detail about to take the proper golf grip. 

What you want to observe here is the red line that is drawn from the space between the right thumb and forefinger. Or, more simply put, it runs parallel to the right thumb. This is where most golfers go very wrong with the golf grip. They tend to have a very weak grip where this line is pointing more at their face rather than toward the right shoulder. This makes it much more difficult to square the club face at impact as the right hand has to aggressively rotate through the hitting area. Obviously, this doesn't meet requirement number 1 of the perfect grip.

However, having the right hand positioned as pictured above makes it much easier to square the clubface at impact. Now, let's take a look at the left hand.


Like the right hand, the red line points toward the right shoulder, only not quite as far. That is because the two lines formed by both hands should run parallel to each other when gripping the golf club. This meets requirements numbers 2 and 3. 

Having the left hand in this position that would be considered slightly stronger than neutral allows the left hand to apply leverage to the butt of the golf club while also allowing the golfer to hold the club lightly. 

Meeting these three requirements for the golf grip make it much easier to start building your perfect golf swing step by step. Starting out with a poor grip will make it necessary to build compensations into your golf swing that will cause you more problems down the road, so it's best to start out with it right from the beginning. If you need to rework your grip, watch these videos that go more in depth on how to grip the golf club.

  1. http://www.rotaryswing.com/golf-instruction/swingfundamentals/golf-grip.php
  2. http://www.rotaryswing.com/golf-instruction/advancedgolftechnique/secret-pinky-golf-grip.php
  3. http://www.rotaryswing.com/golf-instruction/impact/golf-grip-proper.php
  4. http://www.rotaryswing.com/golf-instruction/golfbiomechanics/golf-grip-instruction-myth.php
  5. http://www.rotaryswing.com/golf-instruction/golfequipment/bombyourdriver/golf-grip-how-to-lag.php

Sunday, September 30, 2012

Perfect Golf Posture

What is Perfect Golf Posture at Setup?

Posture is an often overlooked aspect of the golf swing. It seems that most amateur golfers believe that it doesn't matter how the setup to the ball, just how they swing the club. Nothing could be further from the truth.

Your setup posture has a dramatic impact on your ability to move freely and produce power in the golf swing. One of the most common issues we see in the golf setup is for golfers to have a spine that is very rounded. A rounded spine at address makes it nearly impossible for you to make a full shoulder turn in the backswing, dramatically limiting your ability to make anything near a perfect golf swing.

In order for the spine to rotate freely and fully, it must be setup in neutral. As you can see in the image of the spine to the left, a neutral spine alignment actually has a lot of curvature in it. It is shaped this way to absorb shock, but most importantly, it is in this position that it has the highest range of mobility.

Many golfers setup with poor posture by rounding their shoulders at address. This setup position is increasing flexion in the thoracic spine.

The thoracic spine is the mid to upper back and this is where the majority of the rotation comes from in the upper trunk.

With the spine "hunched" forward, you severely limit your ability to rotate in the spine and will have a very difficult time making a perfect shoulder turn.

Therefore, learning how to setup to the golf ball with perfect spinal posture is an extremely important fundamental and yet another requirement for making the perfect golf swing.

This golf instruction video talks about how to setup to the ball correctly and shows you the most common setup faults.

Building the perfect rotary golf swing starts with a good setup. Once you're ready to take the next step in building your golf swing, visit http://www.rotaryswing.com!


Thursday, September 27, 2012

Golf Swing Lag - The Most Important Fundamental?

Is Lag the Most Important Fundamental in the Golf Swing?


When you think of two of golf's best ball strikers of all time: Ben Hogan and Sergio Garcia, there is only one thing that comes to mind - Incredible lag! Most all professional golfers on the tour today have waaaaay more lag than the typical amateur golfer, so that begs the question: Is lag the biggest difference between you and a tour pro?

Now, there are a lot of things that go into building the perfect golf swing, but lag should be considered near the top of priorities, but why? The most important reason you need lag in your golf swing is simple:

60% of club head speed comes from the release of the lag angle!!

That's right, nearly two-thirds of your club head speed comes from the release of the right wrist angle in right handed golfers. In fact, using the RotarySwing.com FlightScope X2 launch monitor, we have shown that in the swings of all our professional and low handicap golfers, the golf club accelerates from about 20 mph to over 90 mph with a 6 iron in the last three feet just before impact!

You've heard it millions of times before, "You want a late hit." Having lag is what allows it to happen. Without it, you must try and make up for the powerful leverage that comes from the angle formed by the right wrist and club shaft with some sort of contorted body effort.

Not only is this way less efficient, but makes you less accurate and makes you susceptible to injury.

The Perfect Golf Swing is an EFFICIENT Golf Swing

If you go back to our set of requirements for the perfect swing, efficiency was in our list of the 5 most important requirements. Without lag, you have to come up with some sort of body movement to make up for the up to 60% loss of club head speed. What body parts can you move in your golf swing fast enough to make up for this loss? None of them!

That's because the right wrist is the last contributor to clubhead speed. It's the last thing touching the golf club and has the most direct and immediate impact. If you spin your hips 3 times faster than they are currently moving now, you can swing the club faster, but there is a lot lost in the transfer of energy from your hips to the time it gets to the golf club.

So, if you want lots of club head speed with very little effort, you better start working on your lag and I have the perfect drill to help you do it. But first, let's look at a golf student of mine from today that used this lag drill and see what kind of results she got with 10 minutes of work:

golf lag swing


Yep, 76.5 degrees MORE LAG from one drill and in only 10 minutes. Would you be happy with these results? I thought so.

To increase your lag like this, check out my RotarySwing Tour Lag and Golf Swing Shaping Drill.


Wednesday, September 26, 2012

The Perfect Golf Swing - How to Practice Golf

How to Practice Golf when Building the Perfect Golf Swing


How many times have you seen golfers go out to the range and pull out their driver for their first swing of the day? It would be funny watching these golfers wail away in a futile effort to hit the ball if we all didn't know just frustrating it can be when practicing our golf swings only to get worse.

Any golfer who has worked on changes in their golf swing has spent practice time that ended up making them worse off when they started. Sometimes this is because they are simply working on the wrong things. If that's the case, you simply need a better understanding of the golf swing mechanics.

But often, it's because the golfer doesn't how to practice correctly. Practicing correctly is NOT an art, it is a SCIENCE. The brain learns new movement patterns in a very specific way and only that way. If you don't know what that way is, you are likely just spinning in circles and wasting your time not improving.

The best way to understand how the brain learns a new movement is to relate it something else you've learned in life. I like to use the example of playing guitar or any other musical instrument.

When playing guitar, you don't pick up a new piece of music and rip through it at full speed at first. No, you take your time and work through the song piece by piece and very slowly at first. Then, as you become more proficient, you begin to slowly add speed and so on.

How many times have you done that with your golf swing? Or, do you just go full speed and expect that you'll somehow be able to change a movement that you've already grooved by doing it thousands of times? The brain simply doesn't learn this way. You need to start slow by hitting pitch shots, then half shots, then 3/4 and so on. Depending on the change you're making, this process of building up to 3/4 speed may take several days.

Don't Rush Your Practice Time


The most important thing you can do during this phase is to focus on one change at a time and be patient. Understand that there are physiological changes happening in your brain and just like most all other body processes, they don't happen over night. The body takes its time and you can't force or speed up this process anymore than you can force a wound to heal quicker.

Understanding how to practice golf is a specific science. If you're tired of wasting your time and want to know exactly how to practice, check out this golf instruction article and video that covers it in depth:

How to Practice the Golf Swing

Tuesday, September 25, 2012

Increase Lag In Your Golf Swing

Golf Swing Drill for Increasing Lag

Lag. Every golfer wants more, I'm going to teach you exactly how to get it. One simple drill will change your golf swing forever.

First Know What Golf Swing Faults Destroy Lag

The three most common swing faults that destroy lag are: spinning the shoulders, oversetting the wrists and too much tension. Doing any one of these can set your golf swing on a path to disaster, so read on to make sure you understand exactly what they are.

Fatal Flaw 1: Don't Spin Your Shoulders
Spinning the shoulders is simply starting the downswing by quickly unwinding the shoulders from the top of the backswing. This motion creates a great deal of centripetal force, the result of which is centrifugal force that acts on the club. This centrifugal force causes the club head to release away from you and is powerful enough to over power the wrists and create club head throw away, or a casting motion.

Fatal Flaw 2: Don't Set Your Wrists Early in the Backswing
This age old tip can't die soon enough. David Leadbetter was the first well known instructor to advocate this tip and it's mucked up a lot of golf swings. Here's why:

When this is done, the muscles in the forearms that are responsible for creating the lag are fully contracted and have nowhere else to go during the downswing. A muscle under tension wants to do one thing – release the tension! In an effort to create more force in the downswing, the golfer grips the club even tighter and throws the club at the ball, causing a cast.

Fatal Flaw 3: Lighten Up! Your Grip Pressure that is!
Too much tension in the forearms locks up the wrists and prevents something that is very important in all great golf swings – a downcocking motion. A downcock is simply the act of setting your wrists MORE during the downswing when it’s needed most. Learn the Downcock Pump Golf Swing Drill.


This Golf Swing Drill that is GUARANTEED to Increase Lag


The RotarySwing Tour Lag Drill is a progression swing drill that works you through each step of increasing lag in the golf swing. Here, we're going to focus only on one aspect of it, the right arm.
To start, you’ll need a golf impact bag. The impact bag takes away the fear of making solid contact with the golf ball, you can focus on doing the drill correctly.

Take a short or mid iron in your right hand and hold the club with a light grip pressure. As you swing to the top, you want to purposely minimize setting the wrists. Remember issue number 3 above. Your wrists should be extremely soft and you should barely be holding onto the club. As you swing to the top, you will feel as if you never set your wrists – that’s the exaggeration we’re looking for.

With your wrists uber-soft, swing your right arm back down while keeping your shoulders feeling shut. Keeping your shoulders closed allows helps teach you to stop spinning out of the shot and trains the all important right arm what to do in the downswing.


right-arm-lag-sequence.jpg


Where Does Lag Come From?

Lag primarily comes from the right wrist. That is your "speed hand" in the golf swing so it's critical to train it independent of the body and left hand.


Free Golf Swing Tip: Slowly Work Up to Both Hands

Take your time working back up to both hands. It can be challenging to overcome your old swing faults, so for now, focus on doing the drills with only the right hand. On my website I also walk you through doing this without the impact bag and a secret drill that uses the impact bag and the ball so that the transition to hitting the ball is easier. Check out that golf instruction video here.

Once you've done the drill with the right hand only at least 50-100 times, try putting both hands back on the golf club but keep the left hand super soft. Think of it as a passenger on the club with the right hand doing all the work and your golf swing will look like this:

golf swing lag

How's that for some lag? Would you be happy if you had that much lag in your golf swing?

Any increase in lag for most golfers would be welcomed with open arms, but with this one drill, you can have your cake and eat it too! You'll increase your lag so much your friends won't even recognize you!

If you want to improve your swing fast and make it last, get 25 FREE videos at www.RotarySwing.com.

The How of Golf Instruction

The "How" of Golf Instruction


There are many golf instructors out there today that understand the "What" of golf instruction. In truth, what you want the golf student to do really isn't that hard to figure out as the mechanics of the golf club really aren't rocket science. But, teaching the student exactly "How" to do it, now that's where the rubber meets the road.

An Example of Teaching the "How"

Let's use the takeaway in the golf swing as an example. Most good golf instructors know where they want the club to be at the completion of the takeaway and what it should look like getting there. We can use this shot of Tiger Woods as an example of textbook takeaway.


Note that the camera angle is slightly off here, but for our purposes, this image works great. The clubhead and hands are perfectly in line, directly over the toes and the club shaft is pointing straight down the target line when the club is parallel to the ground and the club face is perfectly square. Tiger hasn't over rotated his hips, nor have his arms broken down. 

So, we can agree, Tiger's takeaway is just about perfect here and every golfer would  be better off if they managed to get in this position. So, just do it! Put the club here and it's done! If it was that easy, everyone would be great golfers!

But, the reality is that the golfer needs to know not just WHAT to do, but HOW to do it! That's where RotarySwing Tour (RST) excels.

RST Teaches the Golfer Exactly HOW to Do It


RST doesn't stop with just teaching you the mechanics of what to do, but breaks it down to the bare bones of exactly HOW to do it. So, back to our example of the perfect golf takeaway. With a Certified RST golf instructor, you're taught exactly which muscles to use so that you learn exactly what it FEELS like to swing the club like great golfers such as Adam Scott and Ernie Els.

With the takeaway, we focus on teaching the golfer to use the muscles in the back, the rhomboid and trapezius muscle specifically, to pull the shoulder blade back in a way that loads the right arm so that it can create a powerful throwing motion in the downswing. 


The image above is taken from the RotarySwing Tour Golf Instruction book that illustrates the movement of the shoulder blade during the backswing and the orientation of the muscle fibers. In an in person lesson, the instructor will actually apply pressure to these muscles with his or her hands so that the golf student can feel exactly which muscles he wants to activate to begin the takeaway.

That's a BIG difference from conventional golf instruction where the poor student is just told "Just put the club here like Tiger! Just watch me and do this!" That type of instruction is of little to no value. Teaching the student the exact muscles that are used during each phase of the golf swing - That's only available at RotarySwing.com


Step 3 Hitting the Golf Ball Perfectly Straight

Step 3 Hitting the Golf Ball Perfectly Straight

Most amateur golfers struggle with the dreaded slice and because of this, most golf instruction is built around compensations to get the golfer to stop slicing immediately. This type of "band-aid" golf teaching is very prolific and, at times, borders on the absurd. Let me give you an example.

I once heard a story of a golf instructor who was doing a clinic and guaranteed anyone in the audience that he could get them to stop slicing in one swing. Everyone there started to salivate and a golfer volunteered who had done nothing but slice since he first picked up a club 20 years ago. Eager to stop slicing, he was willing to do whatever this instructor asked. To fix the slice, the instructor told the student to grip the club a certain way - he told him to take such a strong grip that the club face pointed and rested on the outside of the golf ball rather than behind it! The student looked at the golf instructor bewildered and was terrified the ball would come back and hit him in the foot if he took a swing at it! Never the less, the instructor told him to take a swipe, which the student did with his typical over the top move. However, this time, the ball started left of his target line and hooked about 80 yards left! The student was actually delighted to see the ball go left rather than his typical slice and the instructor stood up and yelled, "See, he didn't slice!"

Sadly, this story is true! The instructor didn't fix the problem but he put a big enough patch over it that the naive student thought his golfing woes were over. But, an 80 yard hook is just as bad as an 80 yard slice and without fixing the real problem of his swing mechanics, the golfer stands to struggle with the swing for the rest of his life. Again, fixing the problem starts with understanding what the problem really is.

The key to hitting perfectly straight golf shots is a square path and square club face angle. That's it. That's all you need to hit the perfectly straight every single shot. Of course, that is easier said than done, but it doesn't change the fact that those are the requirements and nothing else. If the club head is travelling straight down the target line with the club face perfectly square to the target line, the golf ball will fly dead straight. It's that simple.

With a square swing path and square club face, the golf ball will start on your intended line and stay there!


Most golfers don't understand this very simple relationship of club face and path and spend their lives chasing their tails trying to figure out how to hit a straight golf shot. They build in compensations to try and get the ball to work back toward the hole even though their swing path may be pointing 15 yards left of the target. In order for this ball to work back toward the hole, the clubface must be open in relation to the swing path and that will cause the golf ball to spin on an axis tilted to the right that will cause the ball to curve back to the right. So now, without fixing the swing path, you're trying to become an expert in algebra guessing how much the clubface should be open in relation to the target on each shot. When, instead, you should fix the path first and then simply get the club face square to your swing path, and the math becomes a lot simpler - zero and zero!

How to Build an On Plane Golf Swing

So, we know what the requirements are for the straight golf shot are now, we can start the process of meeting those requirements as part of our golf swing system.

Learn more about hitting the golf ball straight in this great article about using a FlightScope X2 launch monitor.

So far, we've determined the golf swing requirements for being consistent and reliable, hitting it straight, hitting it far with little effort and being pain free and injury safe. With our requirements gathered, it's time to start looking at the "HOW" part rather than just the "WHAT" that we've gone over so far. So, how do we build the perfect golf swing?

How to Build the Perfect Golf Swing

Monday, September 24, 2012

Step 2 - Building the Perfect Swing - Making it Effortless

Step 2 in building the perfect swing is to make it effortless. Everyone loves to watch the PGA Tour pro's hit the ball miles off the tee and look like they put no effort into it. The reality here is that they move very efficiently with their body AND club. Let's focus on the body movements of the golf swing first.

In order to be efficient, we need the fewest moving parts possible while still having maximum power available. Many golfers shoot themselves in the foot by having a poor setup, which makes it nearly impossible to have an efficient golf swing. Below is a look a biomechanically sound setup.


Here, the golfer is balanced, with the joints in neutral joint alignment as dictated by the lines drawn. Building the perfect swing starts with the perfect setup.

Once we're setup correctly, it's time to start moving. The takeaway, in the most efficient swings, can be boiled down to little more than a 2 inch shoulder blade glide. This two inches of shoulder blade movement can literally move the club six feet and into the perfect takeaway position. Watch this video to learn more about just how simple and efficient the golf takeaway can be.


Once you have the simple 2 inch shoulder blade takeaway move down, to finish the backswing is just as easy. The key to learning the backswing is to separate the movements of the arms and the body and learn them independent of each other. The learning program you follow must be just as easy to follow as the swing itself. The movements of the arms are actually quite simple when you learn them this way. There are simply two things that you must learn - elevation and flexion.

The arms move up and down in the golf swing while the body creates the rotation and depth in the swing. This vertical movement of the arms RST refers to as elevation. The folding of the trail arm is called flexion. When you combine these two very simple moves together, you get the perfect golf backswing position like you can learn in this video!


The downswing, while more involved than the backswing, still needs to be very efficient in order to develop the perfect, effortless golf swing. The most important component to the downswing is the creation and maintaining of lag. Lag is simply the angle between the arms and club shaft, specifically the right arm and the clubshaft. Lag is where more than 60% of your club head speed comes from, so it is vital for an effortless golf swing.

Creating lag is a topic that encompasses many facets of the golf swing. For now, we will focus on the right arm. The proper movement of the right arm as seen in the SECRET to creating lag in the golf swing video allows this golfer to increase his lag by 18 degrees which resulted in a much more penetrating ball flight and more swing speed with less effort. For golf swing drills on lag, check out this video on golf swing lag.


One last thing that must be covered when talking about building an efficient, perfect golf swing. It is critical that the golfer realizes that body only provides about 15% of the overall club head speed. That is not much in the scheme of things and most golfers overdo the body movements in an effort to create more clubhead speed when in reality the arms and wrists provide the vast majority of the speed. Building an efficient golf swing means a relatively quiet body. The body has a job to do, a very important job, but it's far less than what most people think.

So, now that we have an effortless golf swing and we understand some of the keys to how the pro's hit the ball so far, now let's work on our next requirement of how they hit the ball so straight!

If you want to improve your swing fast and make it last, get 25 FREE videos at www.RotarySwing.com.

Step 1 in Building the Perfect Golf Swing

Step 1: Understand Human Anatomy

Most golf instructors like to tell you that there are no golf swing fundamentals because all top level professional golfers swing the club differently. Therefore, by default, you need to rely on their expertise to teach you how to swing the golf club in a way that is best for YOU. After spending a lot of money on golf lessons and getting no results, you try another instructor and he tells you the same thing, but then teaches your YOUR golf swing in a completely different way. In frustration, you turn to the Golf Channel where you hear every single instructor contradict each other. Which one is right?

To understand the answer, you need to first step back and take a look at the golf swing from 30,000 feet. Get some perspective, be analytical. Define your objectives. Do some fact gathering. What are the requirements of your dream golf swing? Let's start there, with a list of requirements.

Requirements for the Perfect Golf Swing

  1. Must be highly consistent and reliable
  2. Must hit the ball a PGA Tour pro average distance
  3. Must be pain free and extremely low stress on the body
  4. Must hit the ball perfectly straight
  5. Must feel effortless on every swing
That's a good place to start. Now, let's try and prioritize them. Number 3 should be of the utmost priority. If you're injured, you can't play golf. If you're sore after every round, you're not going to WANT to play golf. So, before we dive into all the mechanics and physics of the golf swing, we need to meet our most important requirement that it must be a pain free golf swing.

To build a pain free golf swing that keeps us safe from injury, we need to understand what creates injury in the golf swing. Typical golf injuries are lead shoulder impingements, low back pain, torn lead hip labrums, tendinitis in the elbow and wrist and thumb injuries to the left hand in right handed golfers. There are many more, but these are some of the most common and each and everyone can be prevented if we understand human anatomy.

Let's start with hip pain that often results in damage to the left hip labrum in right handed golfers. Labrum tears are very painful and often require surgery. Given that golf isn't a contact sport, this can easily be prevented by keeping the hip from moving past neutral joint alignment at impact. In other words, stacking the lead hip socket over the lead ankle at impact is a neutral position for the hip to be in that protects it from injury while providing for full range of motion. You can see the proper impact position for the hip to be in here: Proper impact position for hip in golf swing.


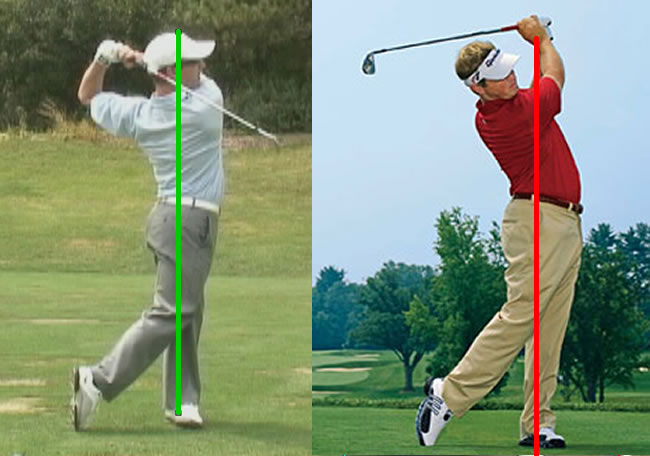
Perhaps the injury that comes to mind first for most golfers when they think of swing related pain is low back pain. This is typically caused by sliding the hips past neutral joint alignment in the downswing by pushing too much off the right foot for right handed golfers. This not only risks damage to the labrum, but causes the upper spine to lean too far away from the target while the lower back has moved toward the target. This compresses the discs in the lumbar spine which leads to pain and discomfort and can even create bulging discs and nerve damage. To avoid this, the golfer needs to ensure that they have their joints stacked in neutral not just at impact, but also in the follow through where numerous injuries to the low back and hip occur. This post on the Stack and Tilt golf swing shows what these positions should and should NOT look like.

Note the position of the Stack and Tilt follow through and how the lumbar spine is in a compressed position.

Understanding the anatomy and the biomechanical load that is placed on the joints, ligaments, muscles and tendons is paramount to having a perfect golf swing that lasts a lifetime. The only golf instruction method that abides by this fundamental is the Rotary Swing Tour method at RotarySwing.com. The RotarySwing Tour, or RST, golf instruction system was designed by this method of first defining the requirements and then working through them, one by one, until the perfect golf swing was born.

So, we know we need an understanding of anatomy to build a safe and injury free golf swing. What's our next requirement? For now, we'll stay on the body stress theme and focus on feeling effortless. Who doesn't love the shots that come hissing off the club face and felt like we barely swung? So, in my next post, I'll discuss how we meet the requirements for building an effortless golf swing.

If you want to improve your swing fast and make it last, get 25 FREE videos at www.RotarySwing.com.